Connecting the timing light:
Connect your timing light as instructed by your vehicle manual.
Make sure the engine is off and the key is removed from the ignition.
Make sure the battery terminals are clean enough to allow for a good connection. If not, then clean as required.
Controls explained: R/A = toggle from rev counter to advance +/- = Adjustable advance timing 4/2 = swap between 2 and 4 cylinders
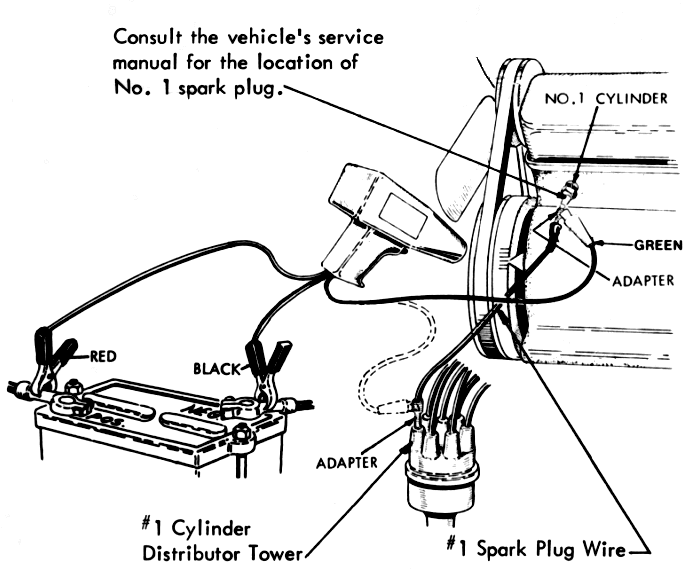
Clamp the red clip to the positive terminal of your car battery and the black clip to the negative terminal of your car battery.
The largest clip (the one with the thickest insulation) goes on your No 1 spark plug lead by attaching the clip around the wire that leads to your No 1 spark plug.
Timing the vehicle:
Rotate the crankshaft pulley so that you can see the timing marks visible on the crankshaft pulley and easily line up the timing light to this point. Be aware that on some cars the timing marks are located somewhere else and you should consult either your owner’s manual or another instruction manual. You may also see a pointer on the engine block that will point to these marks as well, make sure you can point the timing light to this point.
Your car’s spec sheet should tell you what your timing setting degree should be. For example, 6 Degrees BTDC @ 750 rpm with a firing order of 1-5-4-2-6-3-7-8. This means you want to line up the pointer using the timing light with the 6° timing mark on the crank pulley when the engine is idling at 750 rpm. For this example it uses “BTDC” there is also an “ATDC”. “Before Top Dead Center” and “After Top Dead Centre” – top dead centre is the point where the piston reaches the highest point in the cylinder and where there is a line labeled “0” or TDC with marks above and below it.
Use some chalk to mark the timing marks to make them more visible, in the example you must mark 6 degree, then disconnect the rubber hose from the vacuum advance and block the end of the hose to seal it off. Now start up your engine, letting it warm up.
Take your Powerspark timing light and aim it at the timing marks, pressing the button on the TL300. Because you have the light connected to your spark plug means that it has current passing through it every time your spark plug fires, making the light go off and on, creating the strobe effect with the timing marks appearing to be standing still. Now, is that pointer (earlier described) pointing at the correct mark for your vehicle ? ( 6 degree mark in this example ).
If yes, you are all set, reconnect the vacuum pipe, you do not need to adjust your timing and you are good to go! If it is not, you should adjust your timing ( see below ).
At the base of the distributor loosen the clamp so the distributor can turn. Grasp the distributor and move it back and forth and rotate the distributor slightly, and check again with your timing light. Continue doing this until the pointer is pointing at the correct degree point as required.
Once the timing is correct, re-tighten the distributor clamp, and reconnect the vacuum pipe.
Turn off your engine and disconnect the timing light and take the car for a test run.